6.5 Adding layers to a workspace
Having created a workspace and specified one or more data sources for your service, you will now associated data with layers offered by the service in your workspace.
On the left side of the GeoServer Web Administration Interface, under Data, click Layers. This will bring up the Layers page.
On the Layers page, click Add a new resource. This will take you to the New Layer page.
On the New Layer page, use the pull down menu at the top of the page to select a workspace:data source combination that you previous specified. Doing so will populate the New Layer page with a list of layers that may be published; click Publish to make the associated layer publicly accessible to anyone who connects to your web service.
**Note: You may publish the same layer multiple times. To do so, click Publish again.
After clicking Publish, the Edit Layer page for the corresponding layer automatically appears. The Edit Layer page contains two tabs, Data and Publishing
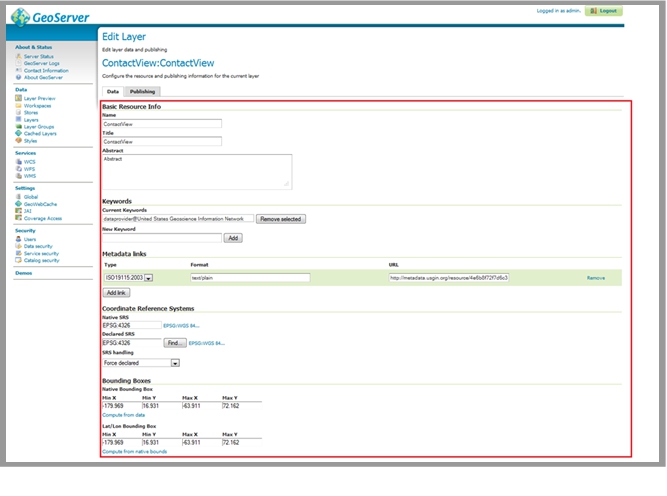
6.5.1 The Data tab of the Edit Layer page
The Data tab contains fields within which you may specify the name, title, abstract, bounding box, spatial reference system, keywords, and metadata links for each layer in your web service. This information will be present within the Capabilities document produced by your web service in response to a GetCapabilities request, so it is very important to enter this information carefully for each layer in your web service.
It is recommended to enter the bounding boxes for your service manually, as doing so permits you to provide a more useful bounding box for your web service.
Note: GeoServer occasionally hangs up. To fix this, try restarting the service on Apache-Tomcat.
6.5.2 The Publishing tab of the Edit Layer page
After populating the fields in the Data tab, click the Publishing tab.
The Publishing tab contains Layer Style settings for the corresponding layer of your web service. Layer Style settings are dependent on the geometry of the layer (point, line, or polygon). See the ‘styling’ section of this document for more details.
Generally, it is faster and more precise to import Layer Style settings from an existing style than it is to manually specify values for each field in the Publishing tab. To import Layer Style settings from an existing style, select the desired style from the Available Styles list.
To populate the Available Styles list, you might need to import layer styles from an SLD file. For further instructions, see the ‘Importing Layer Styles from an SLD File’ section.
When you have populated the fields in the Publishing tab, click Save.
Section last modified: 7 October 2015